
|
How To Improve Test Coverage For Your Android App Using Mockito And Espresso How To Improve Test Coverage For Your Android App Using Mockito And EspressoVivek Maskara2018-07-25T14:00:04+02:002018-07-25T17:27:43+00:00 In app development, a variety of use cases and interactions come up as one iterates the code. The app might need to fetch data from a server, interact with the device’s sensors, access local storage or render complex user interfaces. The important thing to consider while writing tests is the units of responsibility that emerge as you design the new feature. The unit test should cover all possible interactions with the unit, including standard interactions and exceptional scenarios. In this article, we will cover the fundamentals of testing and frameworks such as Mockito and Espresso, which developers can use to write unit tests. I will also briefly discuss how to write testable code. I’ll also explain how to get started with local and instrumented tests in Android. Recommended reading: How To Set Up An Automated Testing System Using Android Phones (A Case Study) Fundamentals Of TestingA typical unit test contains three phases.
If the observed behavior is consistent with the expectations, the unit test passes; otherwise, it fails, indicating that there is a problem somewhere in the system under test. These three unit test phases are also known as arrange, act and assert, or simply AAA. The app should ideally include three categories of tests: small, medium and large.
Note: An instrumentation test is a type of integration test. These are tests that run on an Android device or emulator. These tests have access to instrumentation information, such as the context of the app under test. Use this approach to run unit tests that have Android dependencies that mock objects cannot easily satisfy. Nope, we can’t do any magic tricks, but we have articles, books and webinars featuring techniques we all can use to improve our work. Smashing Members get a seasoned selection of magic front-end tricks — e.g. live designing sessions and perf audits, too. Just sayin’! Writing small tests allows you to address failures quickly, but it’s difficult to gain confidence that a passing test will allow your app to work. It’s important to have tests from all categories in the app, although the proportion of each category can vary from app to app. A good unit test should be easy to write, readable, reliable and fast. Here’s a brief introduction to Mockito and Espresso, which make testing Android apps easier. MockitoThere are various mocking frameworks, but the most popular of them all is Mockito:
Its fluent API separates pre-test preparation from post-test validation. Should the test fail, Mockito makes it clear to see where our expectations differ from reality! The library has everything you need to write complete tests. EspressoEspresso helps you write concise, beautiful and reliable Android UI tests. The code snippet below shows an example of an Espresso test. We will take up the same example later in this tutorial when we talk in detail about instrumentation tests.
Espresso tests state expectations, interactions and assertions clearly, without the distraction of boilerplate content, custom infrastructure or messy implementation details getting in the way. Whenever your test invokes
These checks ensure that the test results are reliable. Writing Testable CodeUnit testing Android apps is difficult and sometimes impossible. A good design, and only a good design, can make unit testing easier. Here are some of the concepts that are important for writing testable code. Avoid Mixing Object Graph Construction With Application LogicIn a test, you want to instantiate the class under test and apply some stimulus to the class and assert that the expected behavior was observed. Make sure that the class under test doesn’t instantiate other objects and that those objects do not instantiate more objects and so on. In order to have a testable code base, your application should have two kinds of classes:
Constructors Should Not Do Any WorkThe most common operation you will do in tests is the instantiation of object graphs. So, make it easy on yourself, and make the constructors do no work other than assigning all of the dependencies into the fields. Doing work in the constructor not only will affect the direct tests of the class, but will also affect related tests that try to instantiate your class indirectly. Avoid Static Methods Wherever PossibleThe key to testing is the presence of places where you can divert the normal execution flow. Seams are needed so that you can isolate the unit of test. If you build an application with nothing but static methods, you will have a procedural application. How much a static method will hurt from a testing point of view depends on where it is in your application call graph. A leaf method such as Avoid Mixing Of ConcernsA class should be responsible for dealing with just one entity. Inside a class, a method should be responsible for doing just one thing. For example,
In the next few sections, we will be using examples from a really simple application that I built for this tutorial. The app has an
Writing Local Unit TestsUnit tests can be run locally on your development machine without a device or an emulator. This testing approach is efficient because it avoids the overhead of having to load the target app and unit test code onto a physical device or emulator every time your test is run. In addition to Mockito, you will also need to configure the testing dependencies for your project to use the standard APIs provided by the JUnit 4 framework. Setting Up The Development EnvironmentStart by adding a dependency on JUnit4 in your project. The dependency is of the type
We will also need the Mockito library to make interaction with Android dependencies easier.
Make sure to sync the project after adding the dependency. Android Studio should have created the folder structure for unit tests by default. If not, make sure the following directory structure exists:
Creating Your First Unit TestSuppose you want to test the
We will start by creating a
Similarly, you’ll need to mock all dependencies required to construct the instance of the
Here’s how it can be done:
Now you are done setting up your test class. Let’s add a test to this class that verifies the functionality of the
The test uses a
Running Your Unit TestsIn order to run the unit tests, you need to make sure that Gradle is synchronized. In order to run a test, click on the green play icon in the IDE.
making sure that Gradle is synchronized When the unit tests are run, successfully or otherwise, you should see this in the “Run” menu at the bottom of the screen: You are done with your first unit test! Writing Instrumentation TestsInstrumentation tests are most suited for checking values of UI components when an activity is run. For instance, in the example above, we want to make sure that the Setting Up The Development EnvironmentAdd a dependency on Espresso:
Instrumentation tests are created in an
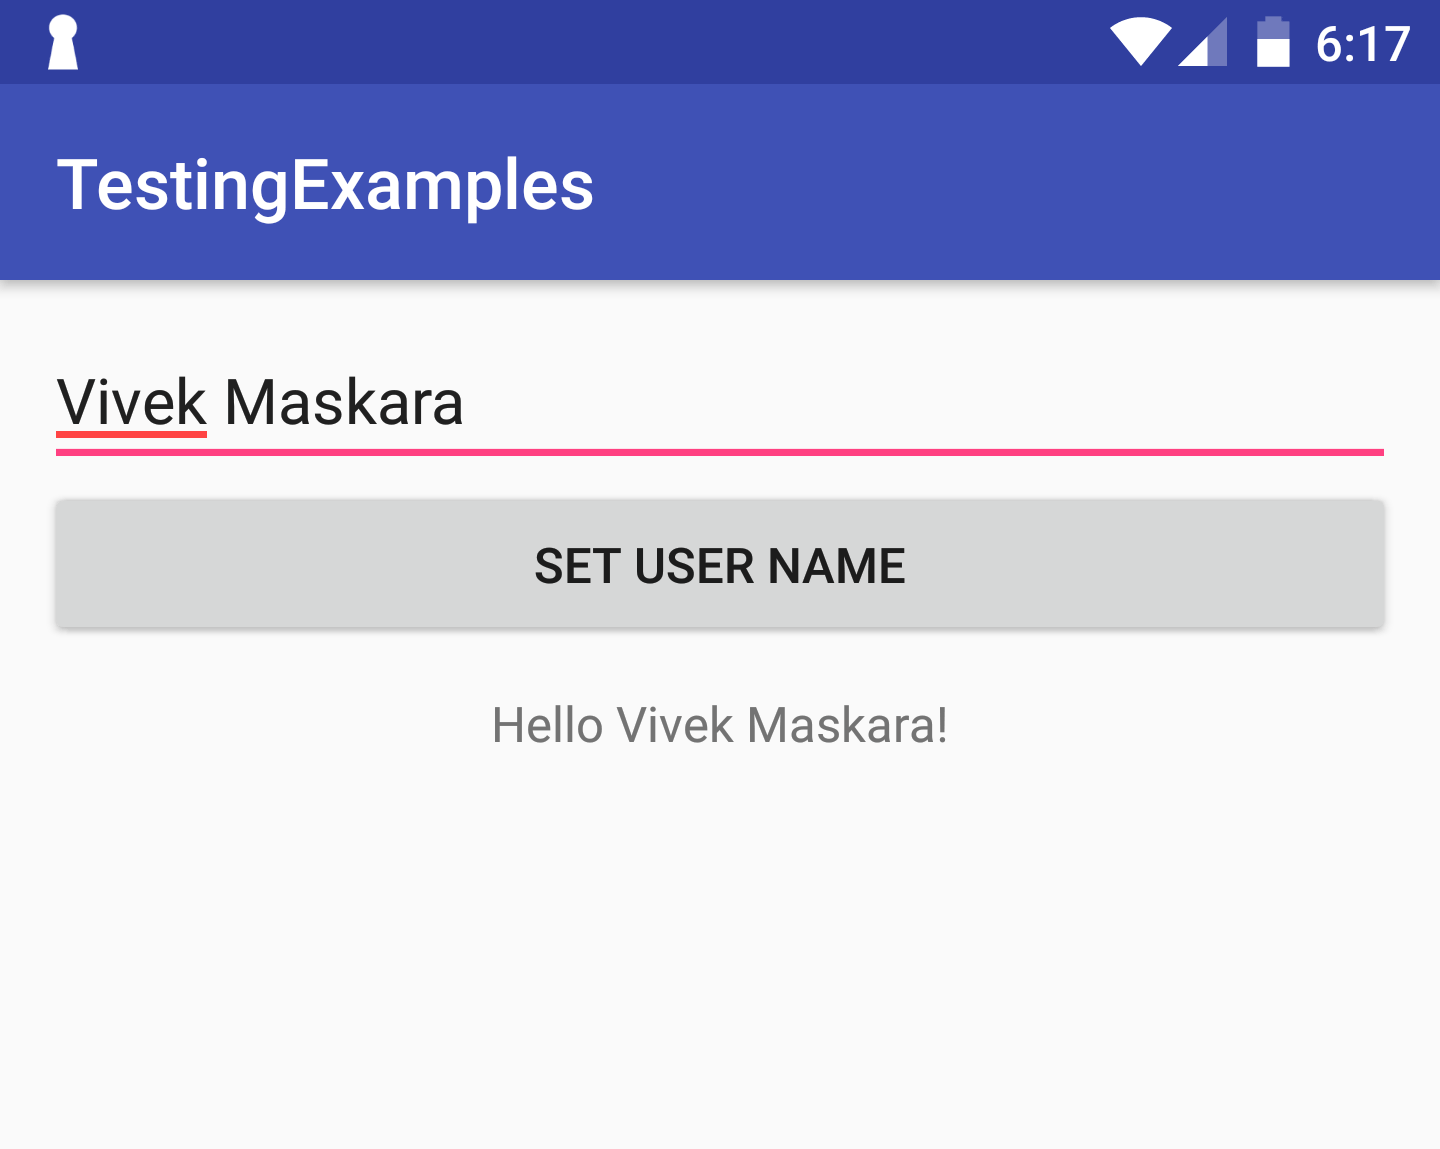
If you want to test a simple activity, create your test class in the same package as your activity. Creating Your First Instrumentation TestLet’s start by creating a simple activity that takes a name as input and, on the click of a button, displays the user name. The code for the activity above is quite simple:
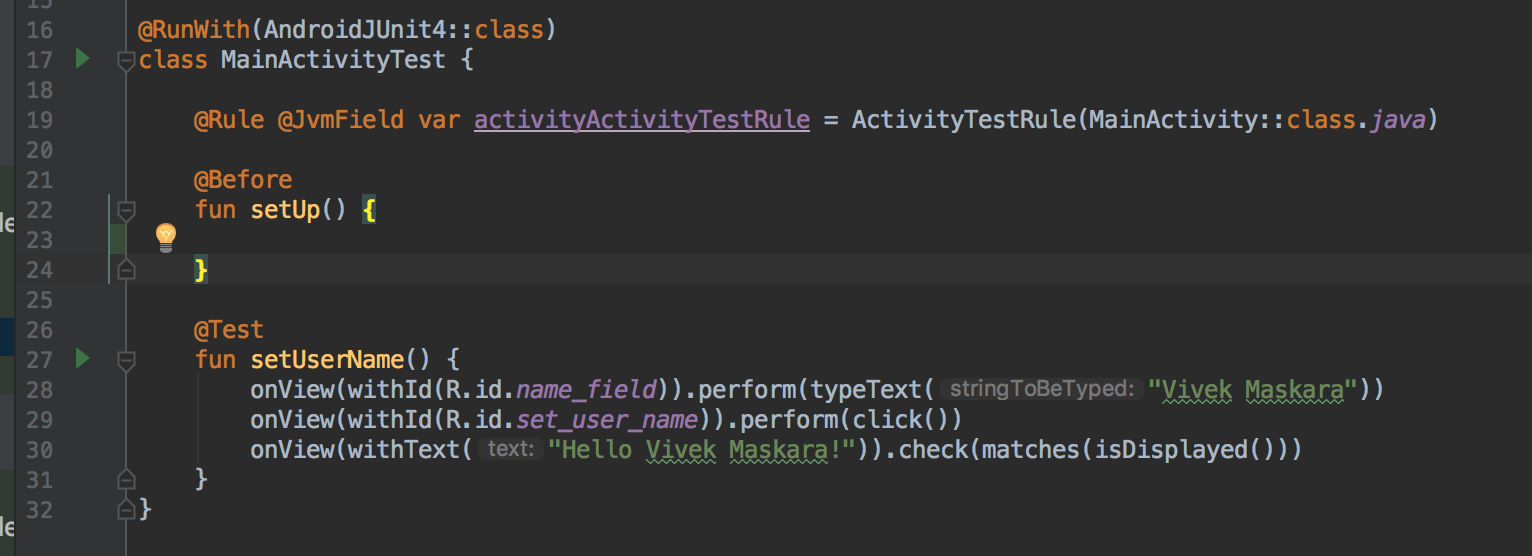
To create a test for the
Next, add an
Now that you are done setting up the test class, let’s add a test that verifies that the user name is displayed by clicking the “Set User Name” button.
The test above is quite simple to follow. It first simulates some text being typed in the The final test class looks like this:
Running Your Instrumentation TestsJust like for unit tests, click on the green play button in the IDE to run the test.
Upon a click of the play button, the test version of the app will be installed on the emulator or device, and the test will run automatically on it.
Intrumentation Testing Using Dagger, Mockito, And EspressoEspresso is one of the most popular UI testing frameworks, with good documentation and community support. Mockito ensures that objects perform the actions that are expected of them. Mockito also works well with dependency-injection libraries such as Dagger. Mocking the dependencies allows us to test a scenario in isolation.
With Dagger in the picture, we will have to set up a few things before we write instrumentation tests. Setting Up Dagger In The ApplicationWe will quickly set up the basic modules and components required for Dagger. If you are not
Create a component in the
The
The
Create a method that returns the already built component, and then inject this component into
Setting Up Dagger In The Test ApplicationIn order to mock responses from the server, we need to create a new
As you can see in the example above, we’ve used Mockito to mock
Next, you need to update the
Running The TestAll tests with the new
The test will run successfully when you click on the green play button in the IDE.
That’s it! You have successfully set up Dagger and run tests using Espresso and Mockito. ConclusionWe’ve highlighted that the most important aspect of improving code coverage is to write testable code. Frameworks such as Espresso and Mockito provide easy-to-use APIs that make writing tests for various scenarios easier. Tests should be run in isolation, and mocking the dependencies gives us an opportunity to ensure that objects perform the actions that are expected of them. A variety of Android testing tools are available, and, as the ecosystem matures, the process of setting up a testable environment and writing tests will become easier. Writing unit tests requires some discipline, concentration and extra effort. By creating and running unit tests against your code, you can easily verify that the logic of individual units is correct. Running unit tests after every build helps you to quickly catch and fix software regressions introduced by code changes to your app. Google’s testing blog discusses the advantages of unit testing. source https://www.smashingmagazine.com/2018/07/improving-test-coverage-android-app-mockito-espresso/ via DerekPackard.com https://derekpackard.com/how-to-improve-test-coverage-for-your-android-app-using-mockito-and-espresso-5/
0 Comments
Leave a Reply. |
Derek PackardDerek Packard has been producing compelling videos for over 25 years. In fact when Derek started shooting award winning video, editing required an air conditioned room and equipment costing a million dollars. Today his laptop provides better tools. At one point, over 20% of Fortune 500 companies owned at least one training series Derek had produced for experts like Ken Blanchard and Zig Ziglar. After working with corporate and government clients in California for many years, Derek compiled numerous national awards for his work. ArchivesNo Archives Categories |


 RSS Feed
